
Business
The new Xero import trick which saves you time and stress – easy

If you do a regular Xero import, we’ve got an easy trick to make your life easier, saving you time, money and stress. Read on and watch our short video to find out what to do to ace this process.
The Xero import is only part of the journey
1 million subscribers can’t be wrong – Xero’s accounting software is sleek, efficient and justly popular. But importing transactions to Xero is only part of the journey – you might think of this stage as the fourth episode in the expenses journey.
But you wouldn’t start watching a series at episode four. It wouldn’t make sense.
To make your Xero import easier, you need to address what happens in the preceding episodes.
The expense ‘drama’
If we think of expenses as a series in which each stage is an episode, it would look something like this:
- Episode One: An employee buys something, using a card or cash
- Episode Two: They fill in an expense report, and submit it with any evidence, such as receipts
- Episode Three: You draw everything together in a spreadsheet
- Episode Four: You upload the spreadsheet to Xero
- Episode Five: Xero takes it from here, hopefully to a beautiful (and neat) ending
At the moment, you’re probably spending way too much time in episodes one to three than you actually need to.
It’s as though they’re constantly buffering, when what you really want to do is just race through them.
Racing straight to episode four and acing your Xero import
What if there was a way of compressing episodes one to three into one slick process?
This question is what led to the creation of Soldo Business.
We felt that businesses were being held back by an unnecessarily fragmented expense process.
The problem was that the different stages weren’t connected enough. Something was missing – a link, you could say.
The missing link in the expense chain was between the payment card, the report and the receipt.
Bringing meaning and unity to the expense chain
Our solution is simple.
When an employee pays for something with their Soldo Business Mastercard, the transaction is stored securely and instantly on our system, together with details of the merchant ID.
As soon as they’ve paid, they can take a photograph of their receipt and upload it to the transaction using the free app. They can also add any notes or tags – this is what we mean by ‘meaning.’ A plain transaction on a normal bank statement can often hide as much as it reveals, especially if the person reviewing the expense reports has to waste time finding out what the purchase was for, and why.
The employee doesn’t need to waste time doing an expense reports, because you’ll have all the information you need at your fingertips via the Soldo Business admin dashboard.
You don’t need to waste time on expense reports either.
This is where the Xero import trick comes in.
All you have to do is select the filters or parameters for the report you want – e.g. date range, employees, tags (such as ‘office supplies’) and more.
Two click reports for Xero import heaven
- Click on <GENERATE>
- Click on <EXPORT>
That’s it.
You now have a beautiful report (full of meaning, aka receipts and notes), in any of the five formats listed below:
- XLS (Excel)
- CSV
- OFX
- QIF
For your Xero import, you’ll want to use XLS or CSV
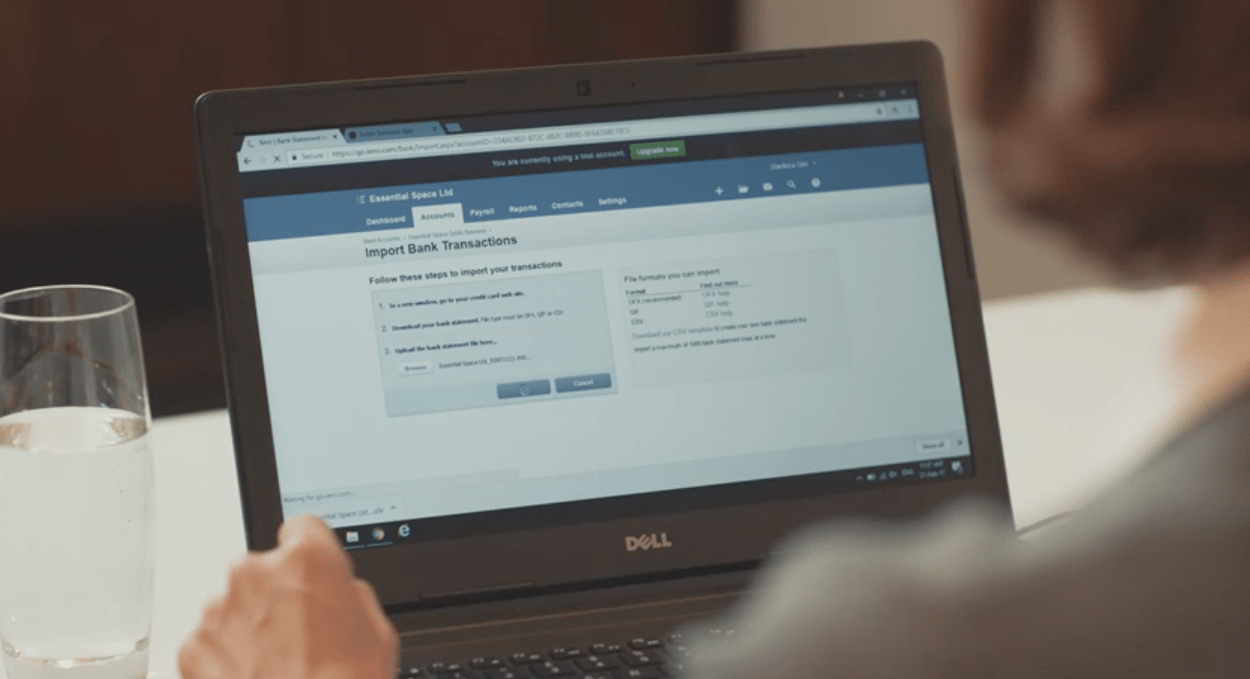
All you have to do is log in to your Xero account, click on <UPLOAD> and select your Soldo Business expense report.
That’s it.
Done.
Watch the video below to see it in action. It’s so easy.
Find out more about Soldo Business today.